Positive Vibrations
5.11a,
Trad, Alpine, 1200 ft (364 m), 12 pitches, Grade IV,
 Avg: 4 from 367
votes
Avg: 4 from 367
votes
FA: FA Harrington, Bartlett 8/81. FFA Bard, Lyde 8/86
California
> High Sierra
> 02 - The Sawtoo…
> Incredible Hulk
Description
This is a phenomenal climb, really the cream of the crop for granite crack climbing. The setting, the line, the rock quality and the climbing itself are all absolutely superb. Although it's continuously steep and strenuous, the movement is very straightforward and above all, fun. No awkward or unaesthetic sections, just clean finger and hand jamming.
P1: 5.9/10a crack. Still not fully awake at this point. Legs as stiff as tree trunks from the hike in.
P2: 5.10c. This starts in a striking finger crack. This woke us up! Excellent sharp fingerlocks in the cool morning air. Higher, follow features right, then left to a ledge.
P3: 5.11a. Some moderate climbing, then the first crux, a blank traverse right. This is one of two pitches rated 11a and we found it to be the easier of the two. The crux is a little reachy (easier if you're tall) but it's over quick. You do traverse past your gear for a couple moves on thin smears but you can see what you're reaching for- a bomber steep handcrack which takes you to the belay.
P4: 5.10b. Really nice stemming and jamming in a big chimney to a huge ledge. This pitch is easy to spot from the base. From here you move onto the upper arete, which is followed for another 4-5 pitches. A very fun pitch.
P5: 5.9/10a. Already giddy from the fantastic climbing so far, we looked up and realized the best was yet to come. Meander up and left to a deluxe handcrack next to the arete. This takes you to a classic belay ledge right on the arete, at which point you should be pretty much euphoric. We thought this was a standout pitch.
P6: 5.11a. The crux pitch starts in a steep dihedral with tricky thin moves in real smooth rock. It's pretty full-on (5.10c/d), one of the most insecure sections on the route. Climb up to a roof (also 5.10+, also full-on) then up a nice finger crack to a small stance. The crux finger cracks cut up and left across golden, vertical granite to another airy stance on the arete. The moves are technical and exposed and just COOL. Steep thin fingerlocks, great body position... at risk of hyperbole, THIS is a classic pitch!
P7: 5.10c/d. Go up 2-3" cracks for a ways into a right facing corner with a detached block. Below the block, traverse right and crank through a technical, sustained stemming/thin crack section. We split the pitch in two, and this last section still seemed really hard. In any case, it's brilliant climbing, another beautiful pitch.
P8: 5.10b. A handcrack leads to a small ledge on the arete, just below the ridge. You do not need to go all the way to the ledge, but we wound up here and were fine with breaking this pitch in two as well. It's actually a pretty sweet ledge, secure and very airy. Either way, you want to get over to the plum-straight hand crack about 15' right. This takes you right to the summit ridge. The dizzying exposure here is augmented by the incredible geometry of the ridge. We thought this was one of the coolest pitches on the route, and a great finish to the hard climbing.
At this point, you're on the leftmost tip of the sharp ridge which appears from below to be the summit. (It took us 10 pitches to get here, in our pedestrian fashion. The guidebook says 8 which is certainly reasonable.) Now you traverse right for 100-150 yards. We thought the routefinding was slightly weird, actually, perhaps someone has better beta on the "best" way to go here. In any case, you shouldn't be doing anything too difficult or gaining any altitude, and you should be out of sight of the valley below. After a bit, you can see what you're aiming for, the final wall with a blocky crack in it. Climb two moderate pitches (see the Red Dihedral description for info on these pitches, and the descent) and through the weird manhole to the top. Congratulations on a super climb and a great summit!
Location
On the NW end of the Hulk. The first 4 pitches follow right-angling crack systems to a big chimney. The rest of the climb follows the knockout arete above.
Protection
full rack to 3". Many finger-hand size pieces.
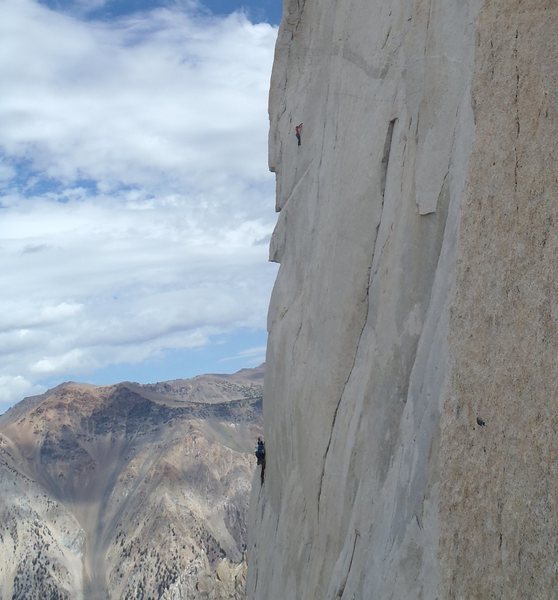
![Justin Dubois at the crux.]()
[Hide Photo] Justin Dubois at the crux.
![Climbers on the crux of Positive Vibrations, 5.11a (Photo taken June 22 2013)]()
[Hide Photo] Climbers on the crux of Positive Vibrations, 5.11a (Photo taken June 22 2013)
![Climbers on Positive Vibrations as seen from the top of the Red Dihedral pitch.]()
[Hide Photo] Climbers on Positive Vibrations as seen from the top of the Red Dihedral pitch.
![Classic corners on the 3rd pitch.]()
[Hide Photo] Classic corners on the 3rd pitch.
![The crux pitch. Had to use alternate belay (one bolt + gear) due to ropes getting stuck under the roof below.]()
[Hide Photo] The crux pitch. Had to use alternate belay (one bolt + gear) due to ropes getting stuck under the roof below.
![Filip pulls through the second 11a crux.]()
[Hide Photo] Filip pulls through the second 11a crux.


 Connect with Facebook


Boulder, CO
Wymont Kingdom
A couple of notes:
Rack: We brought some brass and the green, red, and yellow C3s. All were used, and the C3s were really nice on the technical crux as well as a couple of tips sections.
1) With a 70, link the first two pitches (the 9+/10a and the 10c tips). The crux sections are not sustained and it doesn't require any extra gear to do this. Plus you can stop at a fatty pair of rap bolts for the belay this way.
2) A good way to do the second crux pitch: Build a belay after the 10d fingers section at a bolt right where you traverse towards the crux boulder problem. This shortens the crux and allows you to do it without 35 m+ of rope drag behind you. Aug 2, 2008
on the road
One thing to be aware of: the stemming start to P6 is reasonably technical on small wires and questionable cams (a .75 in a flare and a .4 before moving to the roof and the first bomber gear in 30 feet or so; you can protect the belay by placing a .75 in a horizontal before stepping into the stem).
On the walk-out we ran into Jim D. who was headed up to PV and asked for gear beta. Jul 25, 2009
Sacramento, CA
I found the last pitch going to the ridge was not straightforward once you topout on the ridge. The supertopo was not very clear where to go after you hit the top of the ridge. I am curious as to where others go there. The way we went seemed seldom traveled. I have heard some people traverse right instead of straight up on the 8th pitch to reach the ridge before you traverse right (southeast) toward the red dihedral finish. Aug 11, 2009
Bishop, CA
Supertopo says, "... keep to the ridge for the best rock or drop down onto the N (left) side for easier climbing but looser rock.."
I don't advise dropping onto the N side by any means until AFTER you stick to the ridge via a 5th class chimney system that spits you out on a ledge on the N side of the true ridge. Tunneling is required here. Once on the ledge, loose class 2/3 take you along the left side of the ridge until you meet up with the Red Dihedral finish, which leads to the summit.
Once on the summit, head toward the S Ridge and take a left at a prominent cairn. Downclimb 3rd class to the north side of the ridge to the rap anchor. I thought it was more like 90-100' than the 80' rap described in Supertopo.
Aug 23, 2009
Boulder, CO
Broomfield
Bishop, CA
Tucson, AZ
Durango, CO
The first 11a section on P3 is more like 10a... Sep 15, 2011
Reno, NV
I do agree that P3 is substantially easier than P6, but 5.10a is probably a big sandbag for those under 6'. Sep 16, 2011
Regarding breaking up (or not) P6 of PV - to each its own :-) Feb 3, 2012
Seattle, WA
Overall an amazing route. Looking forward to trying Sunspot next. Jul 13, 2012
Palos Verdes, Los Angeles
Wymont Kingdom
demoted again
It's truly in range of the 5.10+ trad leader who has the endurance for pitch after pitch of 5.10.
Two things: Sometimes those rope stretcher pitches really leave you lacking the requisite pieces. Budget accordingly, or split the pitch up.
Rope drag on the 6th pitch can be truly heinous. I would sling everything long under the roof next time. Aug 18, 2013
Reno, NV
Luckily, I was able to survey the situation, and realized this had only occurred due to the mountain also coming to an end.
Using this information, I was able to calm myself enough to make the rap back to the base of this climb...But you too should be prepared for this discovery, as after 1000 feet of continuous perfect hands and locks, this point will no doubt come as a very disorienting discovery. Aug 18, 2013
Santa Clara, CA
Bridgton, ME
Approximately 100' up the final pitch (Supertopo pitch 8) you will see a single bolt (just out of reach) on your left side (Supertopo optional belay). Near this spot you must traverse RIGHT on a small ledge with some broken rock to gain the final crack (not obvious) to the top. It's helpful to have three #2 Camalots if you plan to do it as one mega 200' pitch.
NOTE: If you don't do this traverse and keep going straight up, the route will continue up a chossy hand crack (watch out for a large loose block in the crack) and dead end at a ledge on the arete about 40ft below the summit and you will have to down climb and do the traverse.
RAPPEL BETA (single 70m or 80m rope)
To avoid getting your rope stuck. From the sub-summit ledge, locate the Venturi rappel nest (15' to climbers right) and rappel to a small ledge with a fixed nut anchor (and sling nest). STOP HERE and pull your ropes even though you will see another rappel station 30 feet below you. Your rope may reach the bolted station below you (80m will for sure), but it is likely that your rope will get stuck at the nut/sling nest ledge (ours did).
Rappel stations below this are all proper bolted anchors and are mostly easy to see, even at night.
As mentioned above, the Venturi rappel eventually joins with the TOP of the 4th pitch of PV (just above the "10b step right" section). We stopped here to pull the rope, then did a second short (30') rappel to the anchors below. Our 80m rope would have PROBABLY reached the lower anchor, but it looked there was potential for the rope to get stuck on that ledge, so we played it safe.
To locate the final rappel station with a single rope, from the top of the second pitch rap station, swing or trend climbers left about 30' to reach the anchor.
We rappelled with an 80m rope, which felt comfortable because most rap anchors looked to be a full 35m apart, however I do know people that have done it with a single 70m rope (with shenanigans).
The whole rappel experience is stressful and time consuming, there are many places for the rope to get stuck. When rappelling, I suggest coiling your rope over your shoulders and lowering down sections at a time, especially when windy.
OTHER BETA
The top of Supertopo pitch 5 has two sets of bolted anchors, one set on the windy exposed side of the arete and another set to the left of the arete in a more sheltered spot.
There is a bolted anchor at the top of Supertopo pitch 6 (second crux pitch). A single 70m rope will not reach to the top of pitch 5, however it LOOKED LIKE an 80m rope would reach. With a 70m it LOOKED POSSIBLE to lower to just past the bolt before the 11a section and swing 30' to the climbers right (on to the face) and reach the Venturi(?) anchors. It might be difficult to do the swing with wind.
We linked pitches 1 & 2 and had no problems with rope drag.
The Supertopo pitch 6, 11a crux felt SIGNIFICANTLY harder than the pitch 3, 11a crux. We split pitch 6 into two pitches at the bolt, This eliminated the rope drag for the crux. Sep 9, 2014
> To avoid getting your rope stuck. From the sub-summit ledge, locate the Venturi rappel nest (15' to climbers right) and rappel to a small ledge with a fixed nut anchor (and sling nest). STOP HERE and pull your ropes even though you will see another rappel station 30 feet below you. Your rope may reach the bolted station below you (80m will for sure), but it is likely that your rope will get stuck at the nut/sling nest ledge (ours did).
Yes, ours did exactly that despite being warned that it might. If I remember correctly it landed on the ledge and got wrapped around a block. I frigged my way back up to the ledge via the L hand crack. There were two rather dubious nuts in the crack above the ledge joined together with some cord. I added two more nuts and some more cord and rapped back down to the bolted anchor below on one rope while being protected by the other at the belay (we had 2x60m 8mm ropes) and pulled the rope easily. I really wouldn't have wanted to have both of us sitting on that ledge, both relying on that anchor. Maybe it's better now? Maybe it should be bolted? Maybe another solution is to pull the rope sharply outwards to avoid it landing on the ledge? It cost us quite a bit of time and we just got to the ground as it became pitch dark...
I should add that this was Sept 2012 so perhaps this intermediate belay is better now. Sep 10, 2014
Phoenix
I found a large turd on the ledge of the 4th pitch. It was difficult to avoid dragging my rope through it. While reviewing mountain project commentary for the Diamond, I learned that the most obvious solution for on route defecation is to use a water bottle. I'm disappointed this technique was not employed on such a beautiful piece of granite like the Hulk. Jun 25, 2016
Truckee, California
How does this route compare to the OZ which we did last week? I've done Red Dihedral but not anything else on the Hulk yet. Jul 17, 2016
SLC
1. Cross the river using an awesome and clearly marked trail by the big boulder/pine tree in a meadow, roughly 45-55 minutes into the hike. This avoids all marsh.
2. Very windy route, cold even in August.
3. Long pitches! Run it out, split up pitches, or if you want pro every 20 feet, bring triples to #2 (and a #3). Every pitch after the fourth seemed to go on forever.
4. First two Venturi rap stations have been updated with bomber stainless rap systems (apparently used to be nests of nuts). Third one (30 feet below second) had two decent looking bolts and some old biners. Avoid a stuck rope by using that third station.
5. First Venturi rap station is around 20 feet climber's right from the top of the route.
6. Apparently you have to climb into that nasty looking chimney 150 feet along the ridge to make it up to the final two pitches and summit? That wasn't clear to us and we ended up rapping. Curious about other options. Confusing ridge system. Aug 8, 2016
Bend, OR
In this photo mountainproject.com/v/10837… it is the block that the rope is running over. It flexed easily with very little effort Aug 20, 2016
Bend, OR
Edit to add: after doing this thing for the 4th time, I (finally) realized that the way to keep the roof from eating your rope on the crux pitch is to place gear in the splitter on the left during the slippery stemming and don't put a long sling on it. This will pull the rope left and away from the crack/lip of the roof. Sep 16, 2016
Oakland
CO
If going to the summit do NOT follow SuperTopo's ridge beta and drop to the left side of the ridge. We did, drop left (when facing the summit), about 20m after the rap bolts by downclimbing some blocks and then traversing towards the summit for a couple hundred meters. This led us to the two absolute worst pitches I've ever climbed. Exploding kitty litter would be generous. Not at all recommended. Aug 27, 2017
Quilmes
Bishop, CA
-Didn't find the supposedly reachy first 11a pitch to be all that reachy. It's all there - just feet and body weight positioning.
-Was surprised by the reachiness of the 10b traverse at the end of P4. Took a little bit to figure out the beta, but it's also all there.
-Found the traverse near the detached block on P7 to be reachiest of them all. I just kind of leaned and hoped it'd work out. It did.
For reference, I'm 5'2. With all that said, don't let the reachiness dissuade you from leading - it all felt relatively safe at those points.
+1 for wearing tape gloves. Mine were shredded by the end of the day. Jul 31, 2018
Atl GA
Where SuperTopo says "No" off right from the pitch 7 belay... I went there. Up a low angle and flared/shallow finger crack, to a small stance below another finger crack that goes up the middle of the face (slightly dirty with a dangerous loose block about 40' up from the stance). It eventually meets up with the long hand crack to the top of the ridge. Off route, but fun. Some stiff (10-something) moves in the incipient crack off the stance.
I simply wasn't paying attention to any topo and started climbing out right from the belay instead of the obvious line out left. I am curious if anyone else has made this mistake. Made for an interesting finish to an amazing day of climbing! Aug 13, 2019
Seattle, WA
San Mateo, CA
Truckee, CA
Tahoma
- The two 11a "boulders" were pretty reasonable (I'm 6'4 so take this with a grain of salt). As others have said, the true difficulty of the route lies in its overall sustained nature.
- Routefinding was harder than I expected. High on the route there are a couple of inobvious, and in my opinion, spicy traverses (esp on supertopo p7)
- We stopped at rap rings on the perch 50' short of the true ridge as we were running out of daylight and started rappelling with an 80m. I tried to trend right and find the Venturi raps but never did. The result was a dark, cold, windy and somewhat terrifying rappel back down the route. We bailed some gear on p7 and a couple slings on some bolted traverse lower down... don't recommend. Start early and move quickly friends. Aug 23, 2020
Richmond
Little Rock, AR
Looking up at P3, there is a bolt about 30-40ft up. PV does not head to this bolt, and does not traverse right at the bolt. From the belay ledge, P3 should start in the right-facing corner at climbers left (first bit is shared with Sunspot). You will do the step across move about 60ft up and it is gear protected.
To clarify, there appears to be a new variation to P3 (the first 11a pitch) with a bolt protecting a step-across move. This variation included a 10ft section of thin protected 12- immediately after the step-across at the bolt. If you find yourself here like I did, you can aid this with brass nuts then traverse right on jugs into the chimney to eventually join the belay at the end of P3.
There is also a line of bolts heading straight up the face from the P3 belay. I believe this is the route Wind Shear. Can anybody confirm? Jun 16, 2021
Livermore, CA
The hardest moves on the entire route (for me) were the 10c fingerlocks on P2 (I have fat fingers). We didn't do this, but P3 & P4 link nicely to the high bolts with an 80 m rope, making for an EXCELLENT pitch. The climbing before the first 11a crux is easy enough that you can go light on placements, minimizing rope drag when linking.
The start of P6 is NOT difficult to protect! The cam placements are NOT 'questionable' or flaring, just be patient finding the best spot for each placement. Climbing this section as a chimney, with your butt/hip on the left wall, felt very secure to me. I split the pitch in two, and placed about five good cams in the corner before you reach the traverse. You can't do this if doing the 'full' P6, but if you're not up to that it's easy to sew up the initial corner. Totems, C3s, or other cams with narrow head width make this easier to do.
If you can do P6 as one long pitch, DO IT. To minimize rope drag: 2-3 pieces max in the initial corner, all slung long. Last piece in the corner should be a .75 C4out left. No gear at the undercling rest - do the entire traverse (which is easy) before placing another piece, and sling it long. Protect the steep hands, but no gear in the 'chimney' - go all the away to the little roof first. This will set you up to have no rope drag higher, and plenty of gear left to finish the pitch. There are great no-hands stances high on the pitch, so 'linking' is not any harder than pitching it out, as long as you conserve gear and manage rope drag. I was too nervous to manage the former.
P7 is really, really fun.
Nothing on this route is particularly height-dependent. Plenty of hands and feet at both of the 11a cruxes for folks of any size.
How I would link with an 80m, next time:
P1&P2, P3&P4, P5, P6, P7&P8 (maybe?)
EDIT: John Clark is correct - the idea of linking P7 and P8 is ludicrous.
An 80m rope allows you to do the Venturi descent in 11 rappels, with no rope stretchers.
Rack: We brought 16?! alpine draws, triples in finger sizes, singles of smaller cams (one black totem, one purple metolius), and doubles from 0.5 to #3 C4. A decent selection of nuts, including small offsets. I think next time I would ditch one of the #3's and add one more 0.5 C4. Jul 12, 2021
Reno, NV
Overall amazing route as everyone says, but if you know how to hand jam, just rap when you finish P6 and save yourself some boredom and a few raps.
Rack:
Doubles 0.1-3, triple on 0.3,0.4, 0.5, 12 alpines, 1 double length sling
Only used 1 nut to hang our bag up at the base of the route Jul 23, 2021
Texas