
 Connect with Facebook


Routes in Moonlight Buttress

|
Looney Tunes 5.10 6b 20 VII- 19 E2 5b A2+ |

|
Lunar Ecstasy 5.10 6b 20 VII- 19 E2 5b C2+ |
|
|
Moonlight Buttress (Clean Aid), The T 5.8 5b 16 VI- 15 HVS 4c C1 |
|
|
Moonlight Buttress (Free), The T 5.12c 7b+ 27 IX- 27 E6 6b |
|
|
Moonshadow T 5.11b 6c 23 VIII- 23 E3 5c |
|
|
Sheer Lunacy T 5.11 6c+ 23 VIII- 23 E4 5c C1 |
|
|
Sheer Lunacy (Free) T 5.12 7b+ 27 VIII+ 26 E6 6b |
Order Wrong?
Sort Routes
| Type: | Trad, 1100 ft (333 m), 11 pitches |
| FA: | Jer Collins , Jarod Sickler January 2019 |
| Page Views: | 7,373 total · 154/month |
| Shared By: | Jer Collins on Apr 9, 2019 |
| Admins: | Andrew Gram, Nathan Fisher, Perin Blanchard, GRK, DCrane |
Your To-Do List:
Add To-Do ·Your Star Rating:
 Access Issue: Seasonal Raptor Closures
Closures in effect March 1
Check for current Raptor closure conditions at:
nps.gov/zion/planyourvisit/…
Check for current Raptor closure conditions at:
nps.gov/zion/planyourvisit/…
Description

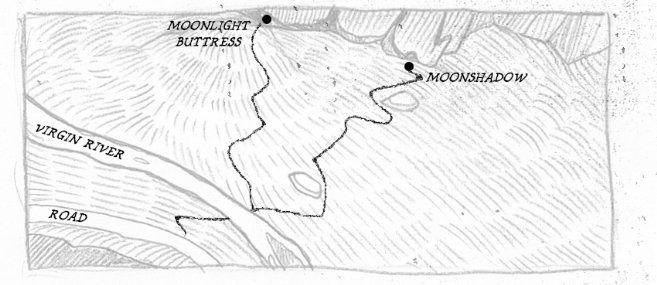
Moonshadow follows a zig-zag line of corners on the right side of the buttress to an exciting top out. Like many Zion routes, there are both brilliant and crusty sections. Avoid this line a few days after rain. The general crack size is fingers to hands, with minimal off-width and chimney which are bolt protected. The route sees 2-4 hours of sun a day depending on the season.
PITCH 1 // .10a 35m
Start in a shadowed alcove beneath three cracks that come together at a ledge 50 feet above. Either commit to the corner on the right (.8) or use it AND the finger crack depending on your arm length. Pull out of the alcove, clip a bolt, then go 10 feet right to an off-width corner peppered with knobs that leads to a great ledge belay.
PITCH 2 // .10a 30m
Stay in the corner past a bolt and a cool boulder problem leading to a left trending ramp/corner to a large right facing corner. Belay beneath a bolted face that leads left. A little heads-up mid pitch on easy but less than perfect rock for 10-15 feet.
PITCH 3 // .9 20m
A fun bolted face leads left. After a midway ledge, step left and follow a right leaning handcrack to a large belay stance.
PITCH 4 // .10a 35m
Scramble up and left 40 feet on a bushy ledge to an EXCELLENT right facing finger and hand crack. At a large roof, traverse left on some odd textured rock beneath a pillar. From here continue left to a low angle runout ledge rising up and right. Going straight up can be done but encounters unpleasant rock and no pro.
PITCH 5 // 4th Class 30m
Step right and scramble up ledges following a fixed line. Belay on a perch at bolts or on a bushy ledge below.
PITCH 6 // .10a 25m
Traverse left on a slab past two bolts to a right facing finger and handcrack in a corner. Follow this wonderful corner to an exit crux onto “lunch ledge”.
PITCH 7// .10c 40m
This is the mega pitch of the route. It is the longest and most varied lead though some great rock. Start up a ramp to a dirty corner on the left aiming towards the massive black and red corner above. Bring the whole rack for this. The crux is passing through the Bombay chimney roof using bolts for pro. In the back of this chimney is a refrigerator sized block one should avoid yarding on with much more than a whisper. It likely won’t fall out for at least another 100 years. The last 40 feet of this pitch is brilliant.
PITCH 8 // .10c 30m
Step left across a gaping chimney and clip a bolt, then follow a ramp up to a stance beneath a bolt and a great but short finger crack. Take this past a hands sized section to a ledge beneath a massive overhung alcove.
PITCH 9 // .10b 34m
A zero star pitch with a four-star crux. Start up the thin hands corner past an arete bordering a chossy gully (tread lightly). At the second bolt traverse left to an arete with a wild exit. This may be the crux of the route if you are short armed. From here the pitch deteriorates passing flaky cracks and not very wonderful rock with easy climbing. Note: Following the low traverse to the arete is a bit thrilling. Stay cool. It’s not too bad. Belay at the bolted rap station or 10 feet higher using finger sized gear on a nicer ledge.
PITCH 10 // .10c 30m
Depending on your tastes this may be either your least or most favorite pitch of the route. Head right up a leaning chimney to a bolt. Exit a roof, then follow a few squirmy wider sections that protect well. After a third bolt, an awkward wiggling steep exit eases the difficulties for an enjoyable finish to a perfect little sky perch belay.
PITCH 11 // .11b 25m
This is my favorite pitch of the route. It has mostly great dark red rock and an airy position above the canyon. From the belay step right to a bolt and make a weird sequence to escape past it in the corner above. From here the line should be obvious. Follow the right leaning crack towards a ledge where you stay in the wide corner (on your left) or step right to a rotten stance and fingerlock to protect (and avoid) the wide section. Above is a finger crack that leads through the crux roof. Pull this thrilling, well-protected sequence to a hand crack taking you to the summit. The rock at the lip proved too poor for bolted anchors. They can be found fifteen feet back from the lip. Tie yourself off and return to belay at the handy little “chair” at the exit. If you are finished early enough there will likely be tourists watching you from the trail. Wave and ask “Is this Angels Landing? We’re lost.”
DESCENT:
A. The route is equipped with 35m or less rappells. A 70m rope is mandatory to rappel the route.
B. Top out and walk a casual 40 minutes west down the angels landing trail to the grotto parking area. If you’ve parked at big bend in the winter you can hitch a ride or walk back to big bend.
Approach
Either take the tram (or drive in the winter) to the Big Bend parking area. Walk three minutes east on the road then drop down a faint trail to the river. Pick a spot to cross beneath the buttress and head immediately right through the grass. After 200 yards you’ll encounter a large black boulder on your left. A faint path starts here behind the boulder leading right-wards towards the wall above a drainage on your right. Eventually you will cross this drainage, hook left and pass a second large boulder (on your right) then zig zag to the base. The route starts in the middle of a 300 foot tall mitten-like feature leaning against the wall. Done correctly the approach takes ten minutes from the road. ![]()
Photos


12 Comments